Assembling a new massage chair typically takes between 45 minutes and 2 hours, depending on the model’s complexity and whether you have assistance. While some chairs arrive nearly fully assembled, others require more extensive setup, including attaching leg rests, armrests, and connecting various cables. Understanding the general process and what to expect can help you prepare for a smooth setup and quicker enjoyment of your new relaxation device.
What Influences Assembly Time?
Several factors contribute to the total time required for massage chair assembly. The most significant is the chair’s design; simpler models with fewer detachable components will naturally take less time. For instance, a basic recliner-style massage chair might only need the footrest attached, while a full-body L-track chair with advanced features often involves more intricate connections. The clarity and detail of the instruction manual also play a crucial role. Well-illustrated, step-by-step guides can significantly reduce frustration and speed up the process, whereas vague instructions can lead to delays.
Having a second person to assist can dramatically cut down assembly time, especially when dealing with heavy or bulky sections. Many massage chairs weigh over 200 pounds, making it challenging to maneuver and align parts alone. Tools provided by the manufacturer are usually sufficient, but having your own set of basic tools, like a Phillips head screwdriver or a small wrench, can sometimes make the job easier if the included tools are flimsy. Finally, your own experience with assembling furniture or electronics can influence how quickly you complete the task.
Pre-Assembly Checklist for Success
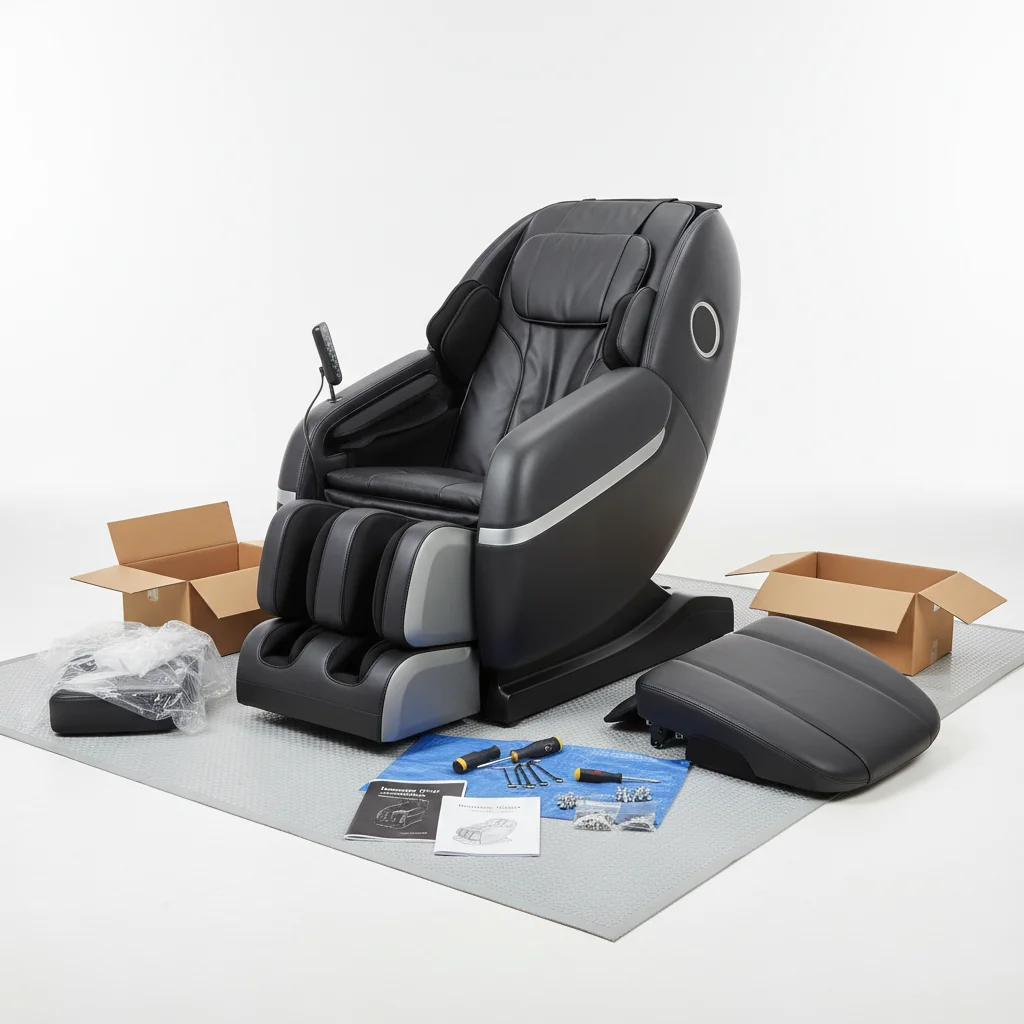
Before you even open the box, a little preparation can save a lot of time and effort. First, clear a spacious area where you plan to assemble the chair. This prevents damage to your floors or the chair itself and gives you room to move around. Ensure you have adequate lighting. Next, carefully unbox all components and check them against the packing list provided in the manual. This helps confirm that all parts are present and undamaged before you begin. It’s frustrating to get halfway through assembly only to realize a crucial screw is missing.
Read the entire instruction manual from start to finish before touching any tools. This gives you an overview of the process and helps you anticipate steps. Organize all hardware (screws, bolts, washers) into separate piles or containers, matching them to the diagrams in the manual. This small step can prevent confusion and ensure you use the correct fasteners for each part. Having a soft blanket or cardboard on the floor can protect both your flooring and the chair’s upholstery during assembly.
Typical Assembly Steps
|
Our Picks for the Best Massage Chair in 2026
As an Amazon Associate I earn from qualifying purchases.
|
||
| Num | Product | Action |
|---|---|---|
| 1 | COMFIER Shiatsu Back Massager with Heat, Dual Motor 3D Rollers, Long Track Deep Tissue Kneading, Foldable Massage Chair Pad with Adjustable Height for Back Tension & Muscle Stiffness |

|
| 2 | belhope Shiatsu Neck and Back Massager with Heat, 4D Kneading Back Massager for Pain Relief Deep Tissue, Comfortable Back Massage for Chair, Massage Mat for Home, Mother's Day Gifts for Men Women |
|
| 3 | Snailax shiatsu Neck & Back Massager with Heat, Full Back Kneading Shiatsu or Rolling Massage, Massage Chair pad with Height Adjustment, Back Massager for Neck and Shoulder |
|
| 4 | Snailax Neck Back Massager with Heat, Full Body Massage Chair Pad, Adjustable Compression, Rolling, Shiatsu Massage Seat Cushion, Chair Massagers,Gifts for Women, Man (Upgrade) |
|
| 5 | Mynt FSA Eligible HSA Approved Shiatsu Neck and Back Massager for Chair with 10 Deep Kneading Nodes, 2D & 3D Back Massage with Heat, Portable Spot Massage Chair Pad (Black) |
|
| 6 | COMFIER Massager Chair with Heat, Shiatsu Neck Back Massager Portable with Compression & Rolling,Massage Chair Pad for Neck & Back for Muscle Tension Relief |
|
| 7 | COMFIER Shiatsu Neck & Back Massager with Heat, Full Back Coverage Massage Chair Pad with 4D Kneading & Adjustable Neck Nodes, Waist & Hip Compression |
|
| 8 | Snailax Shiatsu Back Massager with Heat Massage Chair Pad Kneading Back Massager for Pain Relief Deep Tissue Chair Massage Pad for Office Home |
|
| 9 | Lvrunben Shiatsu Back Massager with Heat, 3D Kneading Massage Chair Pad, Electric Massage Seat Cushion for Body, Neck,Shoulder, with Movable Multi-Function Leg and Foot Massager, for 62-69 inches |
|
| 10 | Snailax Shiatsu Neck Back Massager with Heat, Massage Chair Pad with Compression, Height-Adjustable Neck Massage Rollers Chair Seat Massager, Gifts for Men, Women |
|
While specific steps vary by model, most massage chair assemblies follow a general pattern. The first step usually involves attaching the leg rest or footrest to the main body of the chair. This often requires aligning pins or brackets and securing them with bolts. Next, the armrests are typically attached, which can involve sliding them into place and securing them with screws or a locking mechanism. Many chairs then require connecting various electrical cables for power, remote control, and specific massage functions. These connections are usually color-coded or clearly labeled to prevent errors.
After the main components are physically attached, you’ll often need to connect air hoses for airbag massage features. These are usually push-fit connections that click into place. Finally, the headrest and back cushions are typically installed, often using Velcro or zippers. Once all parts are connected, it’s crucial to perform a final check, ensuring all bolts are tightened and all cables are securely plugged in. Then, you can plug in the chair and perform a test run of all functions to confirm everything is working correctly.
- Unpack all components and verify against the parts list.
- Clear a large, flat area for assembly.
- Read the instruction manual completely before starting.
- Organize all hardware for easy access.
- Consider having a second person assist with heavy lifting.
Troubleshooting Common Assembly Issues
Even with careful planning, you might encounter a few hiccups during assembly. One common issue is misaligning parts, especially when attaching the leg rest or armrests. If a part isn’t fitting smoothly, avoid forcing it; re-read the instructions and double-check the orientation. Sometimes, a slight adjustment or a different angle is all that’s needed. Another frequent problem is confusing similar-looking screws or bolts. This is where pre-organizing your hardware pays off. If you’re unsure, refer to the diagrams in the manual, which usually show the exact size and type of fastener for each step.
Electrical connections can also be a source of frustration. If the chair isn’t powering on or a specific function isn’t working after assembly, first check all power cords and ensure they are fully seated in both the chair and the wall outlet. Then, re-examine all internal cable connections, ensuring they are firmly plugged in and matched correctly according to the manual’s labels or color codes. If a part seems genuinely missing or damaged, contact the manufacturer’s customer service immediately. They can often provide replacement parts or detailed troubleshooting guidance.
Post-Assembly: Enjoying Your New Chair
Once your massage chair is fully assembled and tested, it’s time to enjoy the fruits of your labor. Before settling in for a long session, take a moment to familiarize yourself with the remote control and its various programs. Most chairs come with a quick-start guide for basic functions. Remember that the first few uses might feel a bit different as you get accustomed to the chair’s massage techniques and intensity levels. Adjust settings to find what feels most comfortable and beneficial for you.
Regular maintenance, such as wiping down the upholstery and checking connections periodically, will help ensure the longevity of your investment. Refer to your owner’s manual for specific care instructions. With proper assembly and care, your new massage chair will provide many years of relaxation and therapeutic relief right in the comfort of your home.For advanced models that might require more complex assembly, consider professional installation services if offered by the retailer.
Get our weekly buyer guide
Practical specs, not advice. Unsubscribe anytime.
I appreciated knowing what to expect with the assembly time. My basic recliner-style chair only needed the footrest attached, and I had it ready to go in about 45 minutes. It was pretty straightforward, and I didn’t even need any tools beyond what was provided. Definitely a smooth setup process for a quick enjoyment of my new relaxation device.
My wife and I tackled the assembly of our full-body chair together. It was a bit of a project with all the armrests and cables, but having two sets of hands made it manageable. We followed the steps carefully and were enjoying a massage within 90 minutes. Definitely recommend having assistance if you get one of the more complex models.
I was really worried about setting up my new L-track chair, but it wasn’t nearly as bad as I thought. Having a second person definitely helped with lifting the heavier parts, especially the main body. We got it done in about an hour and a half, which was quicker than the 2 hours I’d mentally prepared for. So worth it for the daily back relief!
My chair arrived mostly assembled, which was great, but attaching the leg rests was a bit fiddly. The instructions for connecting the cables weren’t super clear, and I had to re-do one connection. It took me closer to an hour and a half by myself, which was a little longer than I hoped for a simpler model. Still, it works well now.